It seems like not too long ago I was posting about how to get the ARE Practice Exams to work on your turn of the [21st] century 64-bit Windows 7 machines... you know, like the ones your grandparents use now. It seems that this won’t work on Windows 8 for various, good reasons. The same reasons, in fact, that AIA requires you to keep up with your CEUs. It seems that Microsoft doesn’t really want to support the software it released over a decade ago. So not only has it pulled the Virtual PC and Windows XP Mode used in Windows 7 to make the use of the practice exams possible from it’s most recent operating system, but Microsoft has stopped supporting Windows XP all together (and thus installations of Windows XP mode).
With 2015 promising to be the year that I can actually begin this journey towards licensure I’ve begun searching for ways to get serious about preparing for the exams (ie: installing the practice exams on my home computer instead of just studying for it at the office). Since I run Windows 8. 1 at home my previous setup for running the practice exams was not doing the job for me.

So I spent my two hour allotment of exam preparation searching for used exam guides, flashcards and of course researching how to get the practice exams to run on my Windows 8.1 machine.

While none of my searches for getting the practice exams to work on windows 8.1 turned up anything good, there is hope for those of you already familiar with the exam software. As mentioned over at ARECoach.com some of the software will run natively in windows 8.1. For a list of things which work and don’t work natively on Windows 8.1, jump to the bottom of the article. However, if you just want the practice exam to work the way NCARB designed it to work on their punch card machines of yesteryear then see the instructions below.
First I want to point out that I will not get into explaining what virtual machines are or the actual technology behind Hyper-V. That is a journey you must venture on your own. There are 2 methods that to complete this task. One will require you to install a third party VM software (don’t fret, it’s easier than it sounds). The other is all native inside of the Windows 8.1 operating system environment but requires a computer which supports Hyper-V. I preferred keeping it all native and have a workstation which supports Hyper-V so I will feature this method while highlighting the steps necessary to do this same thing with a computer without Hyper-V support. Some of this sounds scary but it’s very straight forward. If the sound of that last sentence has you thinking twice.. then maybe this is a better option for you.
STEP 1: Determine your Computer’s Capabilities
Skip this step if you know whether or not your computer can support Hyper-V
- From your Windows 8 Start Screen, begin typing “Turn Windows features on or off”
- Select “Turn Windows features on or off”
- Find “Hyper-V” in the list and check all options
(NOTE: If Hyper-V is not listed here or your computer does not allow you to select/install these features, then your computer does not support Hyper-V and you will need to use VMWare Player or another Virtual Machine to accomplish this)
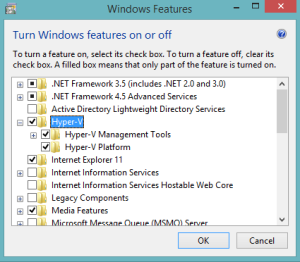
- Click “OK” and let your computer restart

STEP 2: Download Windows XP VHD
Both methods will require a Virtual Hard Drive of Windows XP. Fortunately, the folks at NCARB still run IE6. Because of this, web developers require a testing environment for their websites to ensure our NCARB friends can view websites. Microsoft, while reluctant, understands that many people just can’t let go and have freely given web developers a VHD of a Windows XP. You can download it here:
https://www.modern.ie/en-us/virtualization-tools#downloads
If you are using Hyper-V, choose the Hyper-V for Windows 8 option. If you are using VMWare Player, choose the appropriate option.

Once you download the files (there will be two) run the EXE file. Remember where you extract it. I put it in the same folder as all of my NCARB Crap

If you are using VMWare Player, this is where I get lazy and just direct you to someone else’s instructions:
http://kb.vmware.com/selfservice/microsites/search.do?language=en_US&cmd=displayKC&externalId=2010196
STEP 3: Setup new External Switch in Hyper-V Manager
- From your Windows 8 Start Screen begin typing “Hyper-V Manager”
- Select “Hyper-V Manager”
- Click Action > Virtual Switch Manger

- Select “External” and click “Create Virtual Switch”

- Click “OK”
- You’ll get a warning that says your network connection will be disrupted. Don’t worry, it will come back on


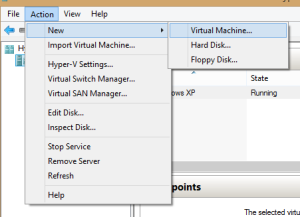
STEP 4: Setup new VM in Hyper-V Manager
- If not already open, run “Hyper-V Manager” as mentioned in the previous step
- Click Action > New > Virtual Machine
- Don’t worry about the name and click “Next”
- Be sure “Generation 1” is selected and click “Next”

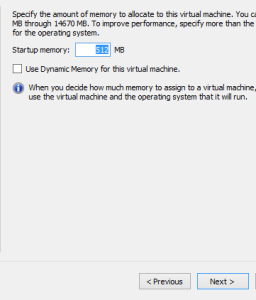
- Leave the default memory input and click “Next”
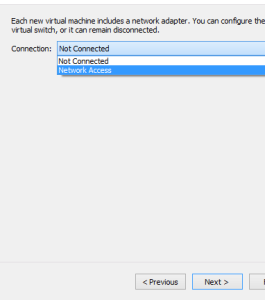
- Select “New Virtual Switch” and click “Next”
(NOTE: If you named this in STEP 3 select the Virtual Switch you created)
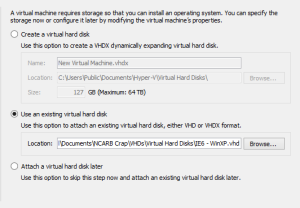
- Select “Use an existing virtual hard disk” and browse to the location of the VHD you downloaded earlier in STEP 2 and click “Next”
- Review the information for correctness and click “Finish”


STEP 5: Take a breath
You’re done with the hard stuff, get a coffee and get ready to study!
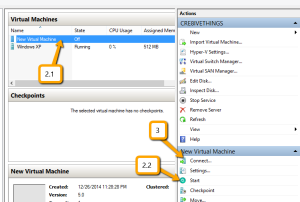
STEP 6: Run your new VM
- If not already open, run “Hyper-V Manager” as mentioned in the previous steps
- Select “New Virtual Machine” and “Start”
- Select “Connect”

You should now have that ever familiar boot animation for Windows XP on your screen. You’ll be presented with a desktop displaying instructions regarding the trial period for the VHD. You can attempt to use the Re-Arm method once the trial is up. If not, you can simply re-install the VHD from the files you downloaded and point the VHD for the VM to the new location after the install. Unfortunately this means you’ll have to re-install the Practice software every time the trial runs out.
NOTE: Let me repeat this. This VHD has a Windows XP install with a 30-day trial. Once that 30 days is over you will lose access to your VM unless you attempt the Re-Arm instruction on the desktop background.
STEP 7: Install the Practice Exam Software
- If you haven’t already, download the Practice Exam Software
- Ensure the Windows XP machine is running. If not, turn it on and wait for it to boot.
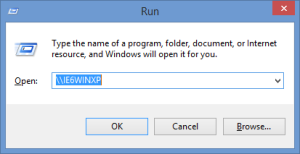
- Windows 8 (Host) type “Windows Key + R”
- Type \\IE6WINXP
- Click “OK”
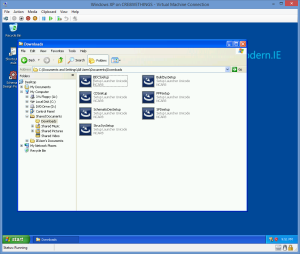
- Open “SharedDocs”
- Copy all Practice Exam install files to SharedDocs
(NOTE: I made a downloads folder to place all of my setup files)

- In Windows XP, type “Windows Key + E”
- Open “SharedDocs”


From here you can install each of the Practice Exam setup files which you have put in here.
STEP 8: Study your little heart out!
If you want to know what will work without the rigmarole of above, here is my experience with the software running on Windows 8.1 with no virtual machine help
- Common Tools: Does not work for any of the practice exams
- Section Specific Tools:
- Works:
- Building Systems
- Construction Documents & Services
- Programming, Planning and Practice
- Structural Systems
- Doesn’t Work:
- Building Design & Construction Systems
- Schematic Design
- Site Planning & Design
- Works:
- Practice Vignettes: All vignettes work
- Calculator will not work on any of the vignettes
Honestly, I feel as though NCARB and Prometric may owe me a passing grade on at least one of the exams for putting this all together just to have the privilege of practicing with their ancient exam tools! Feel free to let me know if you have any questions. Best of luck!
.Carl